Assietta

July 19, 1747


Maria Theresa inherited the vast Austrian Empire upon the death of her father, spurring an opportunistic attack from Frederick, King of Prussia, hoping to steal the province of Silesia.  Other monarchs decided to pile on.  Bavaria, supported by France, joined in the effort to steal Habsburg land.  The war spread, with Britain joining Austria and Spain joining France, among other developments, with Spain hoping to gain territory in Italy.  In 1743, Savoy, whose name through history has sometimes been hyphenated with Piedmont and Sardinia, allied with Austria hoping for territorial compensation.

In 1745 the Austrians and Savoy had re-taken northern Italy from the French and Spanish.  Genoa, however, rebelled against the Austrians, so Austria and its Savoy-Piedmont ally besieged Genoa with help from the British Navy.  The Austrians also advanced into southern France while a small force of 15,000 men watched the Kingdom of Naples, an ally of France and Spain.  In 1747, the Austrian Count Brown was besieging Antibes in southern France, but he encountered supply difficulties, among other issues, so the Empress Maria Theresa ordered him to abandon the siege and fall back behind the River Var.  This caused friction between the Austrians and Savoy, making the siege of Genoa more difficult.  When in June 1747 a French army under Marshal Belle-Isle advanced along the Mediterranean coast, the siege of Genoa was lifted.

Now the French and Spanish decided on a concerted attack on Savoy-Piedmont, hoping to knock it out of the war.  While the Spanish were advancing north along the Appeninnes, Marshal Belle-Isle attempted to advance through Stura Pass.  The marshal's brother, the Chevalier Belle-Isle would advance on Turin from further north.  The French crossed Mont Genevre into Italy on July 15th and 16th and were faced with two valleys, both heading toward their object - Turin, the capital of Savoy.  The northern valley was protected by a fortress at Exilles.  The southern valley was protected by the Fenestrelle fortress.  Between these two valleys was the Colle della Assietta, a mountain with an elevation of around 8,000 feet.  Seeing that the enemy could pass along the ridge, and that a road over the ridge was the best connection between the fortresses of Exilles and Fenestrelle, on June 29th the King of Savoy had ordered that 3,000 workers start building a defensive line there.  To the south, the mountain descends 3,000 feet in around two miles.  To the north, it descends over 5,000 feet in around two miles to Exilles.  Terrain this difficult was greatly advantageous to the Allied defenders.  As an additional advantage, they might descend from the mountain into the rear of an enemy army in the valley.  The French received bad intelligence and believed that Colle della Assiatta was weakly defended.  After a delay of several days due to bad weather, the French army advanced along the ridge on July 19, 1747 hoping to get behind the two valley fortresses.  If they could get behind the Exilles fortress and capture it, the road to Turin would be open.  Instead they would meet the enemy in difficult terrain and behind entrenchments.


That morning the Savoy army woke up early but found no enemy to their front.  Later in the day, however, the French emerged.  Rejecting advice to delay an attack in order to prepare scaling ladders, Belle Isle ordered an advance.  Separating into three columns, the French army of around 40,000 men moved on the enemy position, since reinforced (including a few Austrian troops) to a total of around 7,500 men in 13 battalions.

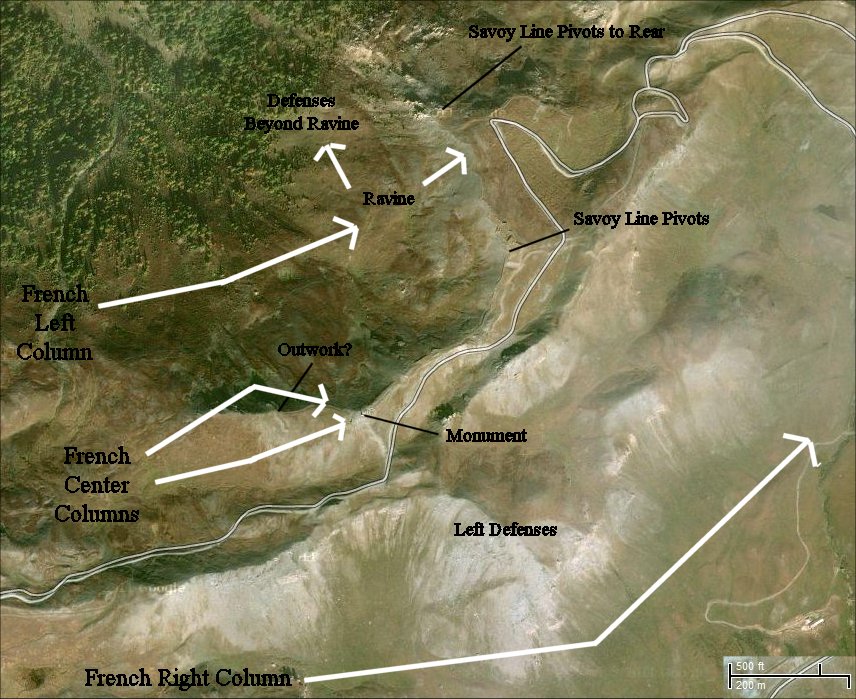
On the map, the Savoy army entrenchments are in red.  The French right column of 14 battalions under the command of Marshal Villemur swung wide to the right and around much of the enemy position to attack it on another section of the mountain.  The effort failed.  On the map this is the column on white troops on the bottom.

The French left column of 9 battalions under General Mailly was to move through a ravine and attack the enemy position.

The French center column of 8 battalions under Marshal d'Arnaud was to attack the salient to their front.  At 4:30, the French attacked.


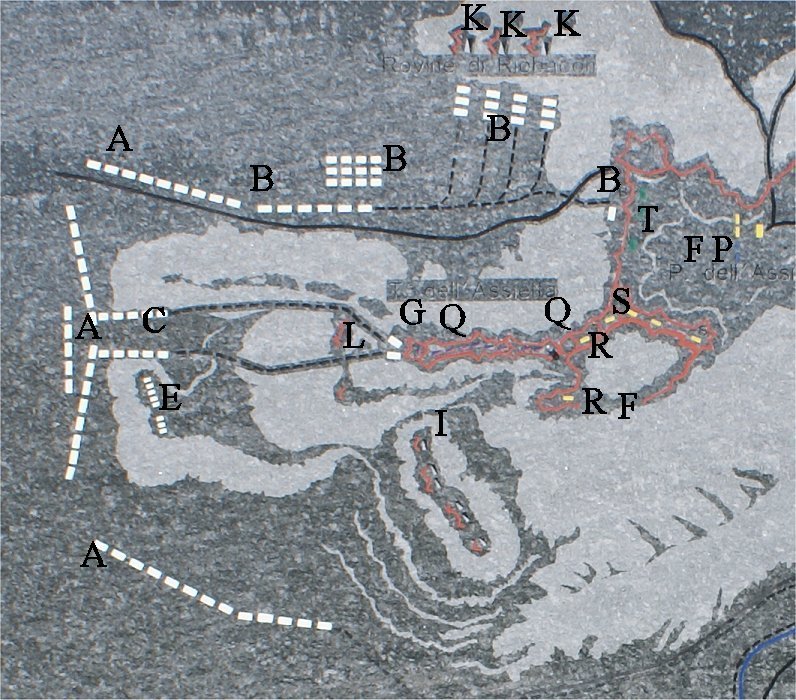
A site from which came the four French columns
B first column
C  
two columns of the center
E French battery
F entrenchment of the hill 'Assietta
G
attack on grenadier guards.  Belle Isle and d'Arnaud killed
I -K reduced defense volunteers
P Austrian Colloredo and Casale Piedmontese
Q
entrenchment defended by the regiment of grenadier guards
R
Hungarian battalion Forgatz
S Austrian Traun Battalion
T
Swiss battalion Meyer


The satellite view should help make the terrain more clear.  Many of the entrenchments are visible.          


This is a 360 degree view from the salient held by the Grenadier Guards and attacked by the center French column, which attacked from the general direction of the road behind and to the right of the large monument.  Chevalier Belle-Isle accompanied this column, and a monument now stands roughly where he was killed.  The right French column advanced beyond the Savoy "Left Defenses" hoping, but failing, to capture the area labeled "Defenses Further to Rear".  The right column attacked three times over difficult terrain but was repulsed each time despite outnumbering the defenders by roughly 4 to 1.  The left French column advanced through the ravine labeled in the panorama, sometimes called Massacre Ravine.  A portion of this column continued forward to attack the defenses visible winding along the slope.  The majority of the French left column, however, diverted to their left, attacking Savoy outworks near the label "Defenses Beyond Ravine".  These Savoy outworks are not visible in the panorama.


These panoramas are from in front of the Savoy position:


The French eventually brought up seven guns to bombard the enemy position.  Judging from maps, these guns may have been on the ridge above the vehicle in the panorama.  The Savoyards had no artillery to respond with.


This is the slope at the tip of the salient.  To the left of the large monument lower down the slope is the Belle-Isle monument.  The carnage was severe for the center column.  Unable to scale the wall, which was 7 to 8 feet high, the French tried to tear it down.  The Savoyards, running low on ammunition, threw rocks.  Others exposed themselves on the wall to bayonet or shoot the French.  Four attacks were made, all failures.  Observing the battle from the artillery position, the Chevalier Belle Isle thought that the decisive moment had come.  Approaching the fight on horseback, he was wounded but continued on foot.  Reaching the enemy walls, he was shot again, this time fatally.


We have walked from the distant monument (the site of Belle Isle's center column attack) down to the base of the salient.  Here you can see the fortified line pivoting to the right along a ridge.  Next we will walk along that ridge.


At left is what looks like a small fort along the fortified line.  To the right of it is the monument at the tip of salient.  The French left column attacked the line somewhere near where we are standing.  Four attempts were made to take the defenses, but all of them failed.  The French left column then pulled back and attacked into the area of the trees.  By this time it was too late to make any progress.  The fight in this area lasted about two hours, with the Bourbonnais losing around a thousand men.  La Reine lost over 800.  Having suffered terribly and fearing an enemy counterattack, Marshal de Mailly withdrew.


The French attacks were a disaster.  Belle-Isle was dead along with Marshal D'Arnault and many other high ranking officers.  Montcalm, a colonel who would become famous in Canada during the next war, was left wounded in a ditch overnight covered with bodies.  The French lost around 5,000 men in all.  Accounts give the losses of Savoy and its allies at just 219.  The Franco-Spanish attempt to crush Savoy was a failure, and the war settled down in Italy after the battle.  The Peace of Aix-la-Chapelle, or Aachen, ended the war the next year with Savoy gaining some territory.  The kingdom continued to survive and in the next century was prominent in efforts to unify Italy:  the King of Savoy would become King of Italy.


Copyright 2012 by John Hamill


Back to John's Military History Tour of Europe