Colleville Draw


Colleville Draw

This is the eastern, or left, portion of Omaha Beach, assigned to the 16th Regiment of the 1st Division.  Unlike the 29th Division's half of the beach, this sector would have few houses, and shingle instead of a seawall.  From here, you can see from Point de la Percee through the invasion beaches that we have already seen.  (See zoomed photo below.)  Colleville Draw was protected by two German strongpoints on either side of it, WN 61 and WN 62.  Further east is the Cabourg Draw, the easternmost, or leftmost, of the draws on Omaha Beach.  Beyond that are cliffs, then Port en Bessin.  Beyond that are more cliffs, then Arromanches, where a Mulberry Harbor would be constructed, then the British invasion beaches.

Troops would land on the beach toward Cabourg, near where the bank become a cliff.   Three LCVPs with part of Company F, 16th Regiment landed directly in front of WN 61.  (See section on Cabourg Draw.)  

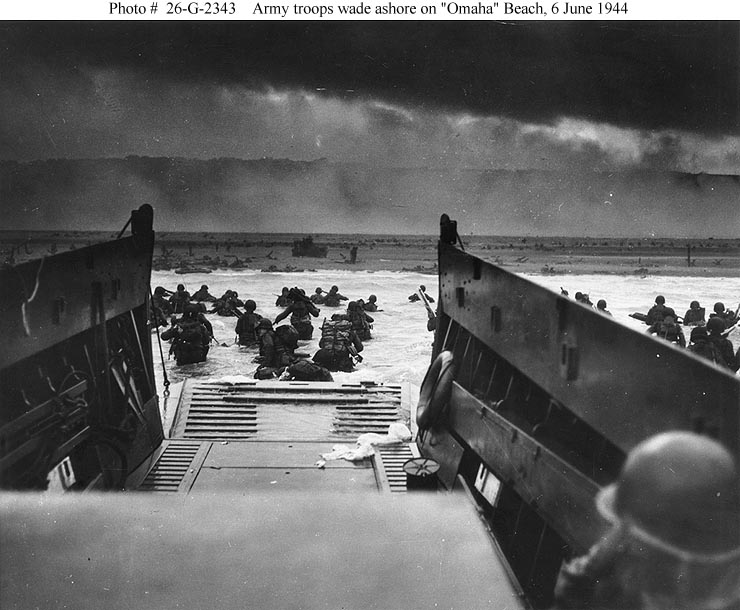
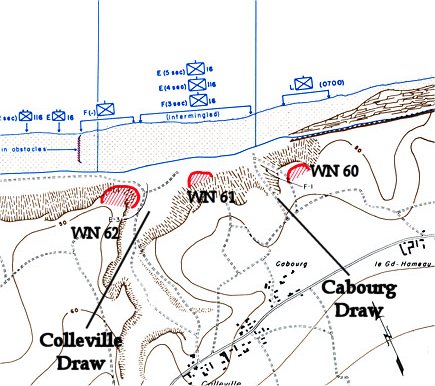
Further to their right, five LCVPs with part of Company E, 16th Regiment landed.  After a gap, three more LCVPs landed directly in front of WN 62.  Further still to the right, about halfway to St. Laurent Draw, an LCVP with a group of Company E, 16th Regiment landed, then just to their right landed two long, lost LCVPs of Company E, 116th Regiment men -from the 29th Division, two miles from their intended landing area!  Like elsewhere on Omaha Beach, all these groups of men hurried across the beach, under heavy fire to the protection of the shingle.  Like everywhere else, there was little evidence of air or naval bombardment.    


Weak Spot Between Colleville and St. Laurent Draws

This is the approximate area that the group of Company E, 16th Regiment landed in an LCVP.  To their right men from Company E, 116th Regiment also landed, two miles off target near Vierville Draw from two LCVPs.  The 1st Division men, under Lt. John Spalding strode across the beach as fast as they could, considering their wet clothes.  Taking flanking fire, they got 20 of their 32 men across the beach.  They had landed at a weak point in the German defenses between strongpoints, about halfway between Colleville and St. Laurent Draws.  WN 62 500 yards to their left dominated Colleville Draw.  To their right, WN 64 dominated St. Laurent Draw.  To their front in the distance the bluffs had minefields, trenches, and German soldiers, but nothing like the defenses at the draws.  Immediately to their front were three run down houses with stone walls.  Blowing a hole through the wire with a bangalore torpedo, Spalding's men immediately went forward through the gap, past the run down houses to a minefield at the foot of the bluffs.  Seeing a somewhat sheltered route up the bluffs, platoon sergeant Phillip Streczyk lead the men up the hollow, despite the mines that the Germans had laid to protect the vulnerable area.  Amazingly, though, none of the men set off mines, although later groups would.  

At around 7:00, another wave landed near Colleville Draw, also with bad results, including the death of a battalion commander.  Near here, additional troops landed as well.  Some tanks were now on the beach, and Company G, 16th Regiment under Cpt Joseph Dawson landed in six LCVPs.  Weighed down with heavy equipment, the men of Company G walked across the beach.  But now the group had machine guns.  The 2nd Bn HQ landed from an LCVP.  Offshore, Col Benjamin Talley was observing the situation in a DUKW to report to Gen. Gerow, head of V Corps.  In addition to seeing the infantry disaster at Colleville Draw, Talley witnessed four tanks moving along the beach - after three were knocked out, the fourth fell back toward the surf. 


These photos, taken on D-Day, are from the area between Colleville and St. Laurent Draws.


Attack Up the Bluffs

This is the hollow, sowed with mines, that Spalding's men climbed - on the left side of the panorama.  They rushed a machine gun at the top and took its operator prisoner.  The "German" was actually Polish, so Phillip Streczyk, who could speak Polish, talked with him.  The Pole said that only threats from his superiors made him fire his weapon, and he tried to miss the attacking Americans!  He was sent down to the beach and gave useful intelligence.

Immediately afterwards, men of Company G, 16th Regiment under Cpt Dawson arrived, having blown their own holes through the wire beyond the beach and attacking up the hollow on the right side of the panorama, taking out a machine gun nest near the top with a grenade.  The men from the 116th Regiment joined the attack also, and Company C, 16th Regiment landed nearby and advanced up the bluffs too. 

With a good number of men now up the bluffs, Spalding advanced along the German line on the crest of the bluffs in what is now the cemetery and captured WN 64.  This along with attacks from the beach, opened up St. Laurent Draw.  Other men went inland toward the town of Colleville, helping open up the Colleville Draw.  Col. Taylor on the beaches was urging the men forward.  


This is the view from the beach directly in front of WN 62.  


1st Division Memorial With Part of WN 62

There are a number of ruins of WN 62 that you can visit, including trenches and positions for artillery.  A trail leads back up to the cemetery.


WN 62:

8 - 7.62 cm gun
15 - 5cm AT gun
23 and 24 - barbed wire
26 - wet anti-tank ditch


This map excerpt shows what the Allies believed WN 62 to consist of based on aerial reconaissance.  Presented from the perspective of the beach, north is down.  This specific map was carried by Cpt Armellino, commander of Company L, 16th Infantry, 1st Division and is used courtesy of his son, John Armellino.  Full version of the map is here.


View from a WN 62 gun emplacement to the west.  You can see the curvature of the beach.  Also note a high area just beyond the beach, then a lower area before the bluffs.


Copyright 2010-17 by John Hamill


Back to Omaha Beach

Continue to Cabourg Draw