Hougomont

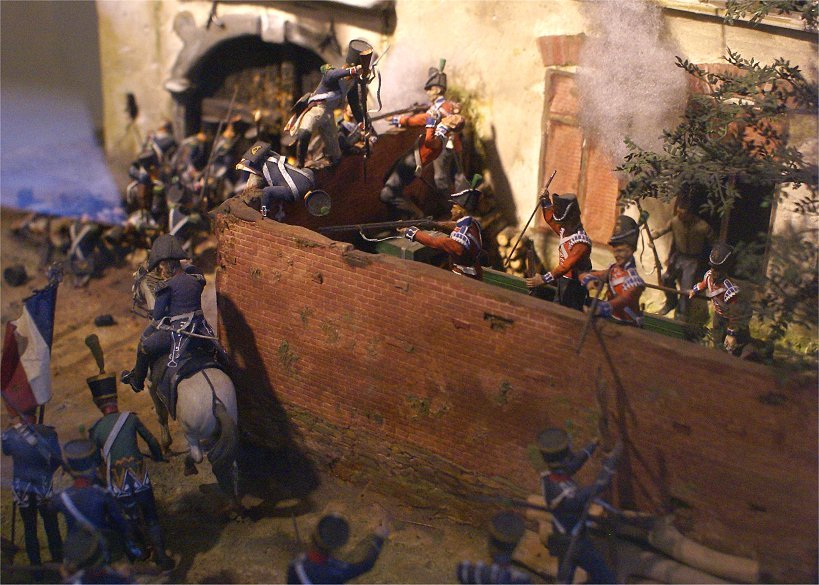
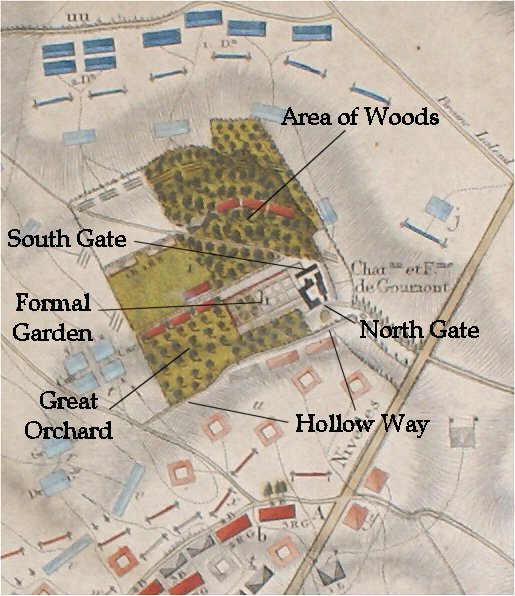
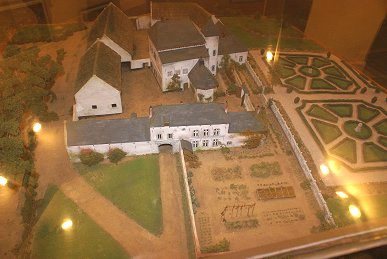
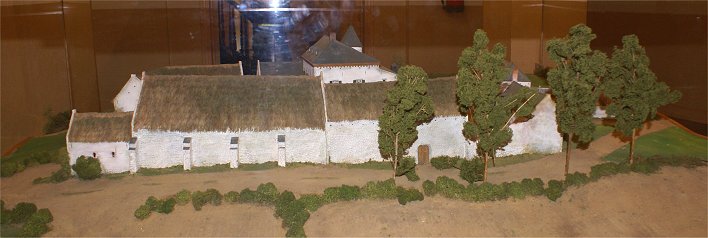
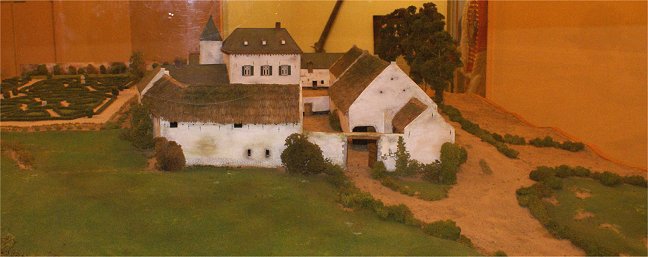
North is down on this map of the Chateau Hougomont, somtimes spelled Hougoumont or more properly the Chateau de Goumont.  The defense was commanded by Lt Col Macdonnell.  The wooded area was defended by 1st Bn, 2nd Nassau Regiment and Hanoverian Jagers and Landwehr.  The light company of the 2nd Bn, Coldstream Guards under Lt Col Wyndham defended the chateau.  The light company of 2nd Bn, 3rd Guards under Lt Col Dashwood defended the Formal Garden.  The Great Orchard was defended by the light companies of the 2nd and 3rd Bns of the 1st Guards under Lt Col Saltoun.  The initial French attack captured the woods, which was all that the plan intended, and the brigade commander, Bauduin, was killed.  But the fight escalated, and the French were unable to continue past the wall of the formal garden.  Jerome commited his other brigade, that of Soye, to the fight.


South Side

This diorama is at the Panorama museum.  The dirt road extending around the building to the left passes the West Gate to the rear of the complex of buildings.  French troops circled around the buildings in this direction to the North Gate.


West Side

The light company of the 3rd Guards started the battle in the lane along the west side of Hougomont.  At around 12:30, the French attack began to drive the British light company north along the lane.


North Side and North Gate

The light company rushed to get through the North Gate and close it behind them.  A group of about 30 French troops from the 1st Brigade of Jerome's division managed to break through the North Gate with an axe, capturing seven Nassau men.  Allied troops fired on the intruders from windows while Lt Col Macdonnell, commander of Hougomont, organized a counterattack, managing to close the gate.  All the French were killed or captured.  A young drummer boy was among those spared.  Later, a single Frenchman climbed over the gate to open it but was killed.


This view is from atop the wall of the remains of the building complex, which is much altered.  The wall was much taller then, here being the wall of stables.  In the afternoon, around 2:45, Napoleon ordered its bombardment.  With rooves made of straw, fire spread quickly, and many of the wounded succumbed.


Wellington sent seven companies of the Coldstream Guards to push the French out of this area north of Hougomont.  The commander of the seven companies, Maj. Woodford, had his men spare the life of Col. Cubieres.  The two remained friends after the war.  This is the view from the northern edge of Hougomont, the "Hollow Way", a sunken road in a low area.  Later in the battle, British troops used the Hollow Way for cover after being driven from the Great Orchard, not labelled here but to the left of the Formal Garden.  

The woods visible here north of the Hollow Way did not exist during the battle.


French attacks took heavy lossed trying to capture the brick wall at left, which encloses the Formal Garden.  The grassy area in front of the wall was then a kitchen garden.  

Next, we will walk toward the Allied ridge along the brick wall perpindicular to this one.


This 360 degree panorama is from a small hole in the east facing wall around the formal garden area.  British troops were behind the long stretch of brick wall in the right-center of the panorama with the Formal Garden to their rear.  Using platforms built the night before, or firing through loopholes in the brick, the men inflicted many casualties on the French.  At around 2pm, the 3rd Guards reinforced the men there.  Although a monument to the French exists in the Formal Garden, only three or four French made it into the place, killed as they came over the wall.  On the far left and far right of the panorama is the Allied ridge, with the mound marking where it pivots.  A brigade of Foy's division engaged in a see-saw fight for the Great Orchard, attacking from the general vicinity of the farm equipment here.  The defenders, when pushed back to the 'Hollow Way", the line of trees on the far left and far right of the panorama, fire from the east-facing wall that we are looking through would protect them and help push back the attacking French.


This is the view further east near the border of the Great Orchard and the woods south of it in the plowed area.


South Gate

The French later made an attempt to storm the South Gate.  This, too, was unsuccessful, due to British fire from the windows above the gate and from the perpindicular wall of the Formal Garden.  


Diorama at Wellington's HQ


Napoleon intended the attack on Hougomont to divert Allied troops, but in reality the fight served to divert many more French troops.  Although the Allies ultimately commited 3,500 men to the defense of Hougomont by around 2:30, the French sent 9,000 men forward.  The fighting here claimed roughly 5,000 casualties.  Late in the battle, howeve, the figures are much closer to parity, around 14,000 French compared to 12,000 Allied troops.   

Considering Jerome's division comprised nearly half of Reille's II Corps and that parts of the other two divisions got sucked into the fight for Hougomont, Reille had few uncommited infantrymen.  With D'Erlon's I Corps getting a rough treatment from its 1pm attack, and with Lobau's VI Corps diverted to face Blucher, Napoleon's options became limited.  Napoleon's cavalry attacks that afternoon lacked infantry support and were indecisive.  The French cavalry attacks did have the benefit of complicating Wellington's resupply of ammunition to Hougomont and the relieving of troops there.  These same effects contributed to the fall of La Haye Sainte.


Copyright 2010-11 by John Hamill


Back to Waterloo