Antietam
IX Corps Attacks, Burnside
Bridge and Beyond
September 17, 1862

View of Toomb's Georgians
|
On the southern end of the battlefield, General
Burnside was ordered
to attack the Confederates to his front. Burnside,
the commander of the IX Corps, previously in the campaign had commanded
a wing composed of two corps. At the battle of Antietam, Jacob
Cox would technically be in command of IX Corps under the close
guidance of Burnside. It would take three attacks and several
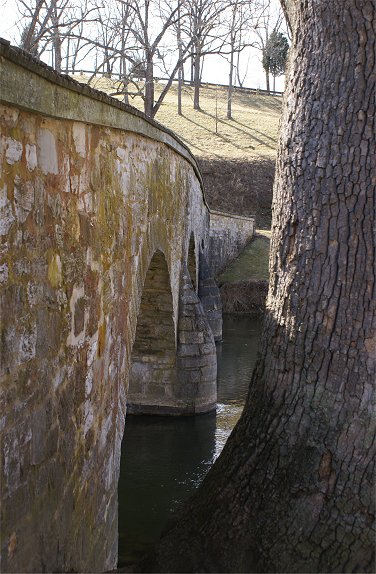
hours to capture the stone bridge over Antietam Creek
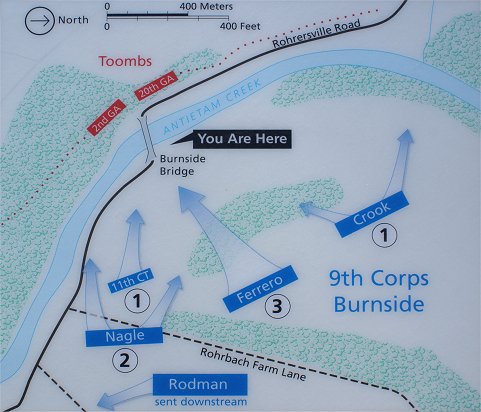
1) At 10am, the
11th Connecticut and Crook's brigade attacked the bridge, bungling the
effort. Approaching from behind the ridge east of the creek, Crook
ended up 300 yards north of the bridge.
2) At 11am, Nagle's brigade joins the effort but is also pinned down.
3) Two regiments of Ferrero's brigade captured the bridge at 1pm.
For the third attempt, Col. Ferrero choose the
51st Pa. and the 51st
NY to storm the bridge, about 650 men. First, artillery was
rolled down near the creek
to blast Confederate defenders with canister shot. The two Union
regiments
charged down to the stone wall and opened fire. Georgians under Gen.
Toombs
defended the hilltop above the bridge and poured fire into the
advancing Yankees.
Eventually, men of the two regiments charged across the bridge.
While their bravery was an essential element in capturing the
bridge, other factors were also involved.
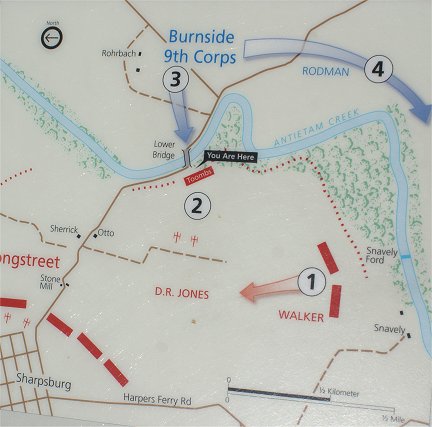
Rodman's division had been sent downstream
and crossed at Snavely Ford after enduring sniper fire. Rodman
now threatened
to flank Toombs' men. (The ford had been protected by Walker's
division earlier in the battle, but Walker had been sent north for the
West Woods counter-attack.) In danger of being flanked and low on
ammunition,
the Georgians overlooking the bridge fell back. They had
inflicted 500 Union casualties and
held up the Union advance for hours. It was now 1 P.M..
Burnside's
corps would now cross Antietam Creek and be McClellan's main
effort.
|
 |

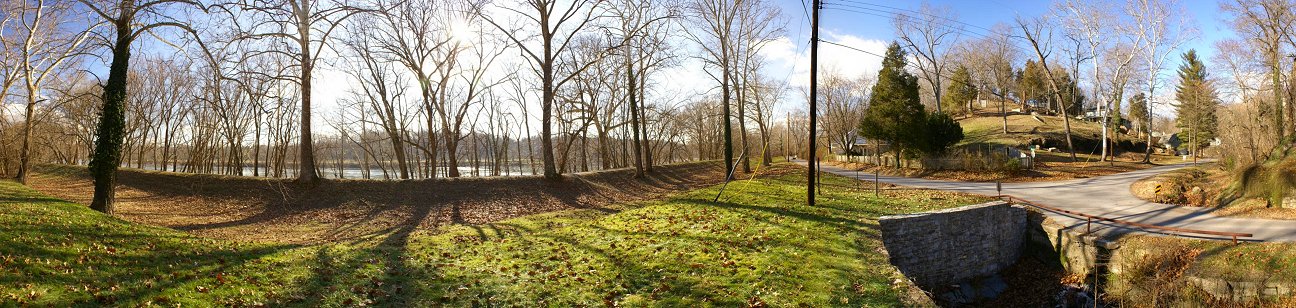
360 Degree View From Union Side of Creek
| Union troops emerged from the ridge on the left of the
panorama to attack the bridge. Formerly Rohrbach Bridge, it would
now be known as Burnside Bridge. Rodman's Division had been sent
downstream, toward the left of the panorama, to cross at Snavely Ford. |
|

Union troops crossed coming in the direction of the camera.

From Confederate Side of Bridge
Once across the bridge, the road makes a sharp right
turn. Although the creek could be waded across in a number of
places, capture of the bridge was necessary to bring across artillery
and other horse drawn necessities. This would take time.

William McKinley Monument
On the bluffs above the creek is one of the more unusual Civil War
monuments - this one to future President William McKinley, then a 19
year old commisary sergeant with the 23rd Ohio, who brought coffee and
food to the troops. This wasn't part of his duties, but being new
to the job, he didn't know it. The men cheered him.

Burnside's Reserve Area
The NPS 'Final Attack Trail' gives access to a good deal of the
area where Burnside's 8,000 man corps deployed into a line about a mile
long then attacked. In addition to trail sites, we will
see views from other places, especially along the roads. From the
ridge at Trail Tour Stop 2 you can see the Antietam Creek valley where
the fighting to capture Burnside Bridge had taken place. This is
the center and right side of the panorama, and the bridge is about 300
yards away. The ridge here is roughly the center of
Burnside's line in the rear where the reserve was. With Antietam
Creek to his back, as the battle developed Burnside did not commit
his reserve knowing that a repulse could lead to disaster if the
Confederates pushed him into the creek. What he perhaps didn't
realize was the extent that he outnumbered the Confederates. All
that kept Burnside from taking Sharpsburg and
destroying Lee's army was the division of D.R. Jones, which he
outnumbered
by more than five to one. All remaining Confederate troops were
committed,
and the only hope for reinforcement was A.P. Hill's division
approaching
from Harper's Ferry.

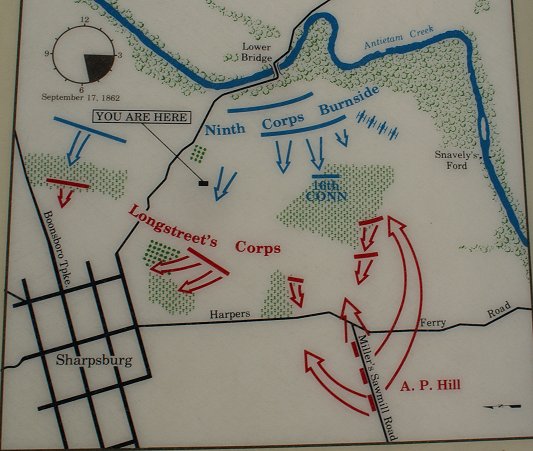
View From Below the National Cemetery
It took until 3 P.M. for Burnside's corps to deploy across
Antietam Creek.
Burnside deployed Willcox's
division on his right - straddling the valley visible here with the
Otto and Sherrick houses. Christ's brigade of Willcox's division
reached here and threatened Confederate artillery on the hill on the
right of the panorama, an area which is now the national cemetery.
The Yankees met skirmishers as they advanced, and clashed with a
South Carolina brigade on this hill. In advance of the rest of
the corps, and taking artillery fire from near modern Branch Ave,
Christ halted until he got support on his left flank. The Rebels
were forced back some, but the Yankees were low on ammunition and
halted. Part of the Union artillery, cavalry, and V Corps had
crossed Antietam Creek on the Boonsboro Pike. They could have
made a decisive contribution to the battle, ending up in the area on
the far right of the panorama, but they were not committed by the
cautious McClellan.
Rodman's division was on Burnside's left, and Sturgis' division was in reserve. They
advanced in a line roughly parallel to the monuments visible here just below Branch Avenue.
These Federals were on course to capture the Harpers Ferry Road and push Lee back into the Potomac.
Their "high water mark" is the Hawkins Zouaves monument.
Next, we will go back to walking the 'Final Attack Trail'.

Otto Lane
On the left side of this nearly 360
degree panorama, you can see a fence line roughly marking the
Union line of artillery. Infantry of Ewing were behind the guns
with Ferrero and Nagle further back. Here, off to the north and
just in advance of the guns is a lane leading down toward the Otto
house. Advancing Union troops used the lane for cover as
they advanced. Fairchild's brigade continued on toward the main
Confederate line along the Harpers Ferry Road, reaching as far as the
Zouave Monument. Behind them was Crook's brigade, with the 28th
and 36th Ohio reaching the modern Branch Ave - the 28th a little
further. The 11th Ohio of Crook's brigade reached the Otto Lane,
thusly the monument.
Next, we will continue to Branch Ave.

Kemper and Drayton Pushed Back
Much of the Union IX
Corps deployed 450 yards to east of here on the ridge beyond the 11th
Ohio monument. During the attack, Fairchild's
Brigade crossed the stone fence here and continued toward the
Harpers Ferry Road. The defending brigades of Kemper and Drayton
along with some artillery were on high ground 350 yards away on far
right of panorama, near the Zouave monument, just off the panorama on
the right.
Crook's Brigade was behind
Fairchild. While the 11th Ohio reached the Otto Lane, the
brigade's other two regiments reached this vicinity.
|
 |

Trail to Zouave Monument
Attacking along the axis of this paved trail
toward the Harpers Ferry Road, the Union troops of Fairchild's brigade
approached the Confederates defending a fence near the monument. The Rebels waited
until the Yankees were within 60 yards to open a devastating fire. After a
firefight, the
Federals stormed the fence and the Confederates of Kemper's and Drayton's
brigades fled to the Harpers Ferry
Road, Lee's vulnerable line of retreat. The monument to the
Hawkins Zouaves, the 9th NY Regiment, marks the furtherest advance of Burnside's
corps. Although the battle was
all but won, the exhausted Federals did not pursue. Fairchild had lost 48% of his men. On the right of the
panorama, McIntosh's battery, an early arrival of AP Hill's division, was
attacked by the 8th Connecticut, which forced the Confederates from their guns.
The situation was desperate for Lee, but soon the infantry of A.P. Hill's
division was arriving just beyond where you can see the Harpers Ferry Road disappear
in the right-center of the panorama. Hill would save the day. With the attack of
Powell Hill,
Hawkins was ordered to withdraw, and the brigades of Kemper and Drayton returned
to their position here on the heights.
Miller's Sawmill Road
At Harper's Ferry, A.P. Hill had left a small detachment to handle the
paroled Yankees and the surrendered equipment and marched his division to join Lee.
The Potomac River is visible on the left half of the panorama. Approaching
from across the river on the left of the panorama, Hill's men passed upstream of
here to cross at Boteler's Ford. Marching along the road toward the
camera, the Confederates turned left up Miller's Sawmill Road then marched uphill
along a creek to arrive on the battlefield just in the nick of time. Having
marched 17 miles in seven hours, only around 3,000 men - or half the division -
was available for battle. Despite their small numbers, they would prove
decisive.

A.P. Hill Counterattacks
This is the view from the right flank of the
Confederate army. The Harpers Ferry Road on the
far left was defended there by Toomb's brigade. The guns here were early
arrivals of Hill's division. Pegram's battery is represented by the guns
visible here. McIntosh's battery was up the Harpers Ferry Road on the left of
the panorama. Kemper's and Drayton's brigades had made their stand against the attacking Yankees
near
the Hawkins Zouaves Monument. Burnside's corps had originally deployed on the wooded
ridge beyond the north/south portion of the Park Service's Branch Road and were
now advancing toward
the Harpers Ferry Road.
Harland's brigade on the extreme
Union left flank was
disorganized and wasn't keeping up with the rest of the IX Corps.
Most of the
brigade was in the 40 Acre Cornfield, located just beyond the North /
South section of Branch Ave. The only regiment to advance, the
8th Connecticut, accompanied by brigade commander Harland and division
commander Rodman,
pushed back Toombs' brigade to the Harpers Ferry Road, getting to with
60 yards of Pegram's guns firing double canister, forcing the
artillerymen to abandon the guns. Division commander Rodman had
been mortally wounded, though, and Harland had a horse shot from under
him, so the Union effort continued to be disorganized. The
isolated 8th Connecticut was counterattacked in front and flank by
Toombs' brigade and AP Hill's infantry arriving from the Miller's
Sawmill Road on the right of the panorama and deploying along the
Harpers Ferry Road.
Two
of AP Hill's brigades protected the right flank. Archer's brigade
advanced directly into the 40 Acre Cornfield
while Gregg's brigade advanced into its southern end. Both
brigades attacked Harland's
brigade in flank, shattering it. The Yankees fled in panic.
Branch's Confederates moved
up the hill on the left of the panorama, along the axis of the
north-south section of the modern Branch Ave, threatening the Union
troops which had captured the stone wall near the Hawkins Zouaves
monument. The whole XI Corps was in danger of being
outflanked, and they fell back toward Antietam Creek having lost one
fifth of
the men.

A.P. Hill Counterattacks Continued
This is the view from near where Branch Ave turns sharply
right to climb up to the Harpers Ferry Road. Hill's attacking infantry
moved from near the modern house on the far right along the axis of the
descending portion of Branch Ave and into the Union flank. (The 40 Acre
Cornfield is on the left of the panorama.)

Trail Tour Stop 8
As Burnside Bridge was being contested, two Confederate batteries here
provided support. With Burnside's deployment across the creek,
two batteries of Union artillery here dueled Confederate guns, now on
the ridge to their front.

Trail Tour Stop 7
Once again, the Union artillery was behind the fence line, with
infantry behind the guns. In front, Fairchild's brigade, with
Crook in support, was attacking, reaching the area of the Zouave
Monument. To their left Harland's brigade was advancing, or
trying to. As we have already seen, the 8th Connecticut advanced
to near the Harpers Ferry Road. Lagging far behind them were the
16th Connecticut and the 4th Rhode Island in the 40 Acre Cornfield.
Archer's Tennessee brigade attacked the two regiments in front
while Gregg's brigade moved around the flank of the two Union
regiments, forcing them to fall back. The 30th and 23rd Ohio
regiments had moved forward to modern Branch Ave to support the two
embattled regiments - now they were flanked and forced back.
This made the 8th CT and Fairchild's brigade vulnerable, forcing
them back too. AP Hill's attack had repulsed Burnside and saved
the day.

16th Connecticut
The monument at right is to the 16th Connecticut, which lost over 200
of its 779 men. At center and left of the panorama, Confederates
attacked from modern Branch Ave.

Southern Flank
The National Park's southern
boundary, and the boundary of the 40 Acre Cornfield, is marked by the
stone wall on the left side of the panorama. Gregg's brigade
marched from the Harpers Ferry Road to this hill, firing into
fleeing Yankees of the 4th RI and 16th CT. The Confederates continued
over the hill and into the Union flank, but feeling that the Union
position at the gun line too strong, most of the Confederates halted
there.
Lee's army was
saved. Although XI Corps still far outnumbered its opponents,
the Union attack was over. McClellan had a division of Porter's V Corps
and his cavalry, but he did not commit them to battle. Another 12,000 men arrived that night, but McClellan
did not attack the next day.
Lee remained on the field the next
day and withdrew across
the Potomac that night, lucky that his army had survived the
fight. The Union's best chance ever to destroy Lee was lost.
The momentum of Confederate success started in June was now over,
however. Lee lost 13,000 men compared to Federals
losses of 12,000 men. The Confederacy could not afford these
unnecessary
casualties. Worse still for the Southern cause, Lincoln announced
the Emancipation Proclamation,
virtually eliminating any hopes the Confederacy had for European
intervention and drastically escalating the Union's wartime
objectives. Without a vigorous after-battle pursuit, Lincoln
became increasingly frustrated and replaced the timid McClellan with Burnside. Although the
battle at Antietam Creek was a frustrating tale of lost opportunities
for the Union, for good reason many historians consider Antietam to be
the turning point of the war.
Copyright 2011, 2008, 1998 by John Hamill
Back to Antietam Main Page