
Cross Keys Part 3
Trimble Counterattacks
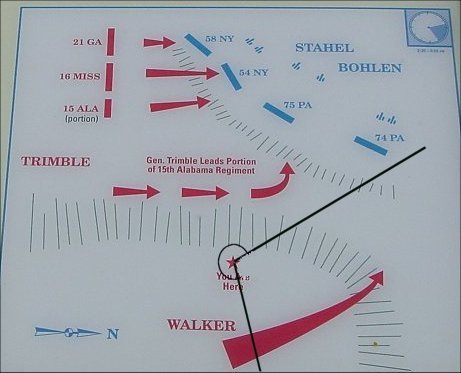
After about twenty minutes, Trimble advanced against the first line of Yankees, Stahel's brigade, starting with his rightmost regiment, the 15th Alabama, followed by the next two regiments in succession. This proved to be a costly way to attack, but it succeeded in pushing the Federals back. This action, I believe, was on ground somewhat higher than the ravine - down the gravel driveway on the right half of the picture beyond the house. (This area is inaccessible private property.)
Bohlen's brigade, had formed a second Union line, I believe on the higher ground visible to the left of the gravel driveway. The right of the Union brigade was on the rise of ground near the road and the modern large farm. This portion of the line had little involvement in the fight. The line stretched along the hills into the distance, and most of the action occurred beyond our sight here. So let's take a look from the Good's Mill road beyond the Union left flank!

Walker Assists Trimble's Second Attack
| Trimble was leading part of the
15th Alabama up the ravine visible on the right half of the photos with the
intention of attacking the Union flank. Finding the hill that you can
see beyond the ravine too well defended to attack, Trimble looked to Col.
Walker for help. Col. Walker, you will remember, had been sent with two regiments to assist Trimble on his right flank. He had been advancing up the Good's Mill Road, visible on the left of the picture, and had then moved toward the ravine into the direction of the Union flank. Walker's men had crowded Trimble's men, and now Trimble ordered Walker to go back further right to advance. Trimble hoped that Walker could move around the Union flank and attack it obliquely, thereby dashing any reasonable Union hopes for defense. |
 |

Walker Attacks the Union Flank
| In this view, the location of the
main Union line was somewhere on the hill visible through the trees on the left
of the picture. Most of Trimble's men were directly facing this line,
but the 15th Alabama was in the ravine hoping to strike its flank. Walker's two regiments, however, advanced on a wider arc through the fields on the right half of the picture. Approaching the Evers House, somewhere on the hill on the right half of the picture, the Confederates began taking canister and small arms fire. (At the time, much of this hill was wooded.) Rushing forward to the protection of a fence, they went to ground, unable to attack the Union flank. After sustaining more casualties than Trimble's brigade did in the fight, Walker withdrew toward the road. (Later in the war, Walker would be called "Stonewall Jim", a name much like that of the man who had once put a restraining order on him.) The high hopes for flanking the Union line had ended, but the Yankees withdrew, followed for a distance by Trimble. A vitally important battery in the Union line had been ordered withdrawn, and the infantry fell back soon thereafter. |
 |
Nightfall saw Fremont's army withdrawn a short distance
in reaction to events on its left flank. The Federals had lost over 600
men, and the Confederates nearly 300. Trimble encouraged Ewell to continue the attack
that night. Knowing
that he was
outnumbered, and without orders from Jackson, Ewell refused. When that
failed, Trimble went to Port Republic and badgered Jackson himself. The next day, however,
although most of Jackson's men were closer to Fremont than they were to Shields, Jackson
would cross the flooding South River and strike his other adversary. At
this battle of Port
Republic, Ewell would lead men to reinforce Jackson and save the day.
Back to Cross Keys and Port Republic