Model of the Chatham Dockyard - 1850s
This beautiful model is on display at the Chatham Dockyard Historical Society Museum. Representing the 1850s, it shows the dockyard much as it is today, with many of the buildings dating from the late 18th and early 19th centuries. A good look at the photos below should help you orient yourself with the photos elsewhere on the website. The Victorian expansion is not represented in the model and would be built further north and several years in the future. Let's take a look, going from north to south.
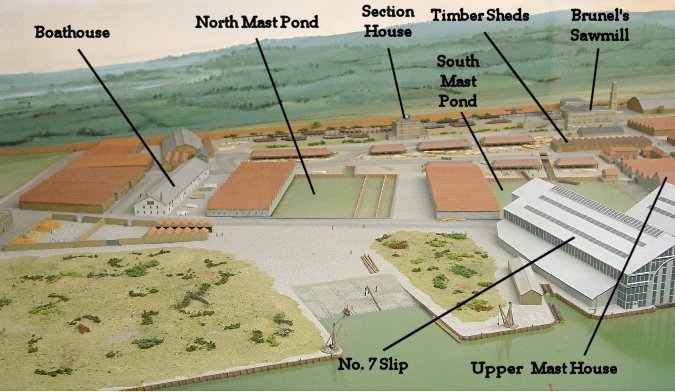
Northern End
The northern end of the dockyard is generally flat, with the area of the covered slipway being on reclaimed land. An uncovered slipway is also shown. The flats were an ideal location for the mast ponds and the canal to Brunel's sawmill, which is on a 35 foot hill. The section house was dedicated to dockyard security.
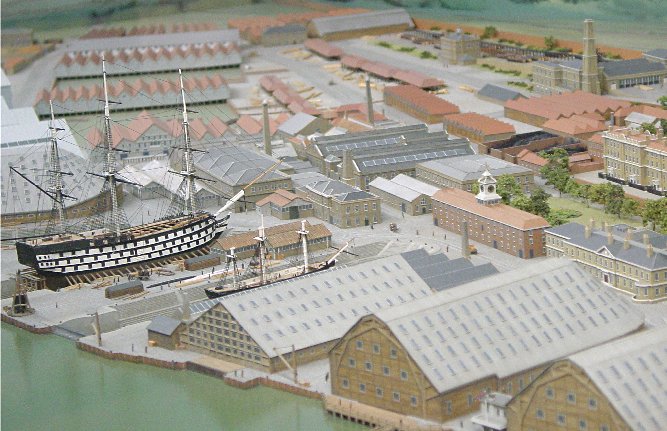
Center Section Looking North
In the background you can see the area seen in the previous photo, with its mast ponds, mast house, Brunel's Sawmill, and so forth. Closer in, you can see Numbers 1 and 2 Smithery, the Clocktower Building, Admiral's Offices, and the Officers' Terrace. On the riverfront, there are two covered slips on right, then the No. 1 dry dock, which is covered, followed by Numbers 2, 3, and 4 dry docks, then the No. 3 slipway. The photo below gives a straight-on view with the buildings labeled.
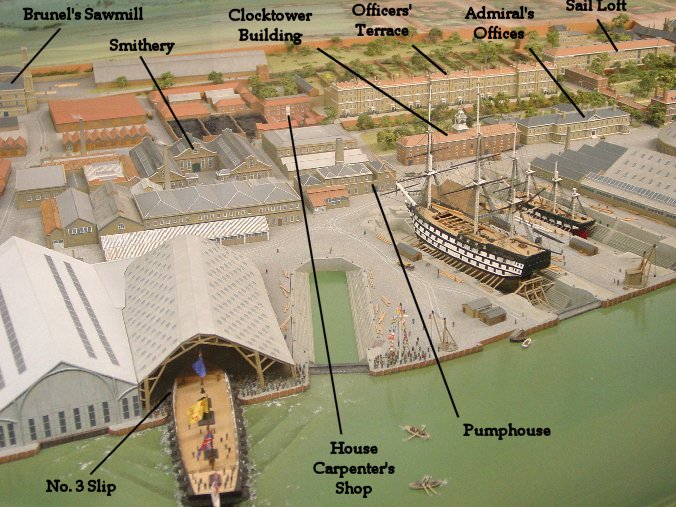
Center of Dockyard
John Rennie, in his study of the dockyard in the early 1800s determined that because of the increased size of ships of the line, the dry docks would need upgrading. They would need to be longer, deeper, and wider. This meant that instead of the usual timber construction, stone would be required. Further, because of the greater depth, they could no longer be filled and drained by the tides; a pump house with a steam engine was needed. The additional length could only come by reclaiming land from the river. A little further downstream, land was also reclaimed and used for the slipways. On the far right of the picture is No. 1 dry dock which is covered, then Numbers 2, 3, and 4 in the center followed by No. 3 Slipway, where a ship is being launched.
No. 1 Smithery is indicated in the photo, with the later No. 2 Smithery in front of it. The Clocktower building and Admiral's Offices are toward the right, with the Sail Loft and Officers' Terrace on the hill behind them.
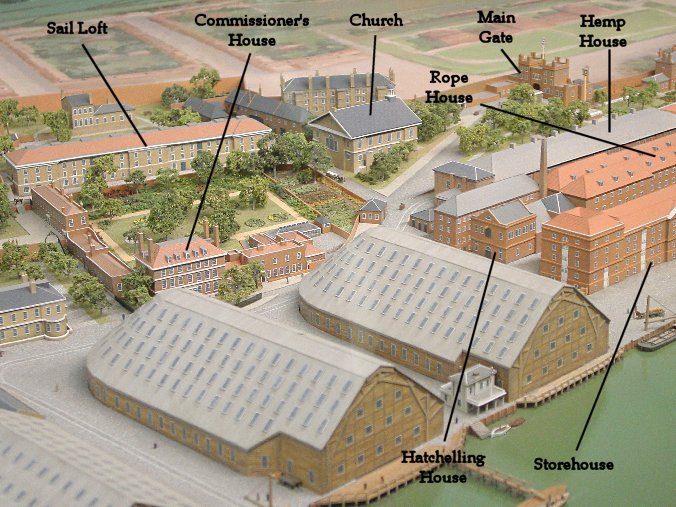
South Central Area of Dockyard
Nos. 1 and 2 Slipways are on the riverfront. Behind them, the end of the Admiral's Offices are on the far left followed by the Commissioner's House. The road passing in front of these buildings climbs a hill past the Church to the Main Gate. The buildings of the Ropery and the two storehouses are on the right of the picture.
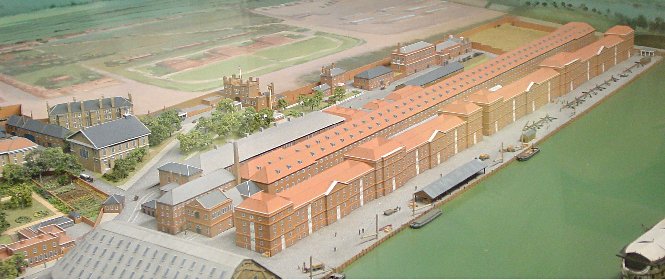
Southern End of the Dockyard
Like in the previous photo, you can see the church and the Main Gate, but here you can see the full extent of the Ropery with the two parallel storehouses on the riverfront. On the Storehouses note that there are doors up to all levels and cranes on the wharf used to help transfer items to boats in the river, which would take the items to ships. On the end of the far storehouse, note the marine guard building near where ship crews embarked and disembarked. Beyond it there was an ordnance yard.
Behind the Ropery in the right-center of the picture is another impressive industrial achievement of the early 19th century, the steam powered Lead and Paint Mill authorized in 1817 for making sheet lead and painting canvas. The building was fireproof, and iron was used in its construction.
Back to Chatham - The Royal Dockyard