Cowpens - The Traditional Version
January 17, 1781
The South was spared the ravages of war for much of the Revolution. The British unsuccessfully attacked Charleston in 1776. The British took Savannah in 1778, and in 1779 a combined American and French army failed to retake the city. Charleston was taken in 1780 and almost all the Virginia Line was captured there. Gen. Gates was sent South, but was soundly defeated at Camden. Only the mountain men's destruction of Ferguson's column at King's Mountain prevented Cornwallis from invading North Carolina in late 1780. George Washington selected Gen. Nathaniel Greene to command the Southern Army, and Greene joined his army in Charlotte on December 2, 1780.
Greene had only about 2,400 men to face Cornwallis' 4,000 men. Stopping Cornwallis with conventional methods would be impossible, so Greene detached Gen. Morgan with 600 men into the direction of Ninety-Six while Greene himself moved to Cheraw with 1,100 men while Lt. Col. Henry Lee was sent to assist Francis Marion in raiding British lines of communication in eastern South Carolina. Although Greene had divided his already weak force, it was positioned so that Cornwallis could not advance into North Carolina without exposing his flanks and rear.
In response Cornwallis detached Tarleton with 1,100 men to deal with Morgan. Tarleton's force included his Legion with 250 cavalry and 250 infantry, 50 men of the 17th Lt. Dragoons, 200 men of the 71st Regiment, 200 men of the 7th Regiment, several companies of Light Infantry, and two 3 pounders. Morgan withdrew in the face of Tarleton's advance and stripped the country of forage. On January 16th, Morgan stopped five miles short of the Broad River to make a stand. His force had been reinforced by about 500 Carolina militiamen under Gen. Pickens. He also had 450 Continentals and good riflemen as well as 125 cavalry including 45 Georgians of Lt. Col. McCall and 80 Continental Legionaries under William Washington, a cousin of George Washington.
The night before the battle, Morgan went to the soldiers' camps and told his men about the battle plan, and he reminded them of Tarleton's massacres and that if they ran, they would be trapped at the Broad River. On the morning of January 17, 1781, Morgan's men had a hearty breakfast and awaited the enemy. Tarleton's men, on the other hand, woke up at two o'clock in the morning to begin the four mile march to Cowpens. At 6:45, Tarleton's cavalry screen reached the clearing at Cowpens. Click for the West Point map.
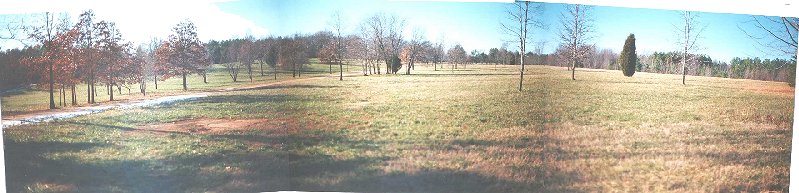
British View of American Position
Cpt. Ogilvie commanding the 50 men of the 17th Lt. Dragoons reached this clearing and saw the American force deployed in front of him. This is a view from the right side of the clearing. In the flat land in the left-foreground there were 150 riflemen serving as a skirmish line. One hundred fifty yards further back, on the small hill on the left of the picture stood the 300 militiamen under Gen. Pickens. Another 150 yards further, on a slightly higher extension of the hill stood the 450 Continentals and riflemen under Maj. John Howard. At the far end of the clearing, and not visible behind the hill were the 125 cavalrymen under William Washington.
Tarleton deployed to attack at this end of the field. Each flank was protected by 50 cavalrymen. The infantry from right to left were the Lt. Infantry, the Legion Infantry, and the 7th Regiment. Two 3 pounders were also deployed. Further to the left, and somewhat behind, was the 71st Regiment. In reserve were the 200 men of the Legion cavalry. Ogilvie's 50 cavalry were in front to push back the skirmishers. Doing so cost them 15 of their 50 men. They then took up their position on the right flank.
The infantry then advanced, and were met with a volley at 100 yards. Despite their high losses, the British kept coming, and the militiamen fell back in confusion behind the Continentals. Ogilvie's cavalry pursued the fleeing militia in the field around the center of the picture. However, they came under fire from the Continental line, and Washington came out from hiding with his 125 cavalry and smashed into Ogilvie's men. After pushing in the skirmish line, Ogilvie had only 35 men left, and Washington swept them from the field, inflicting another 10 casualties.
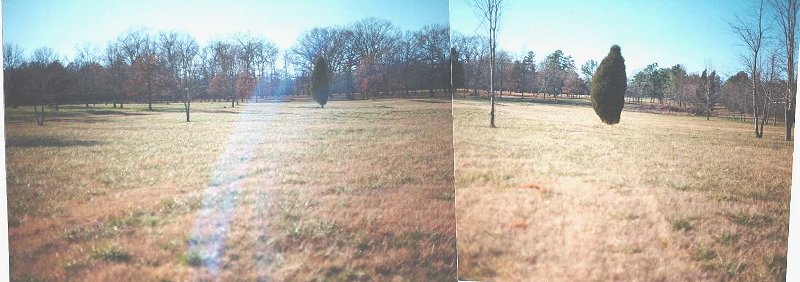
View from British Right Toward Continental Line
Despite having his flanking cavalry routed, Tarleton reformed his infantry to attack the Continental line. This is a view further up the right side of field. Near here and to the left, the British reformed to attack the Continentals on the hill in the distance. The British advanced and exchanged several volleys with the Continentals. On the British left, the 71st Regiment was brought up to flank the American right.
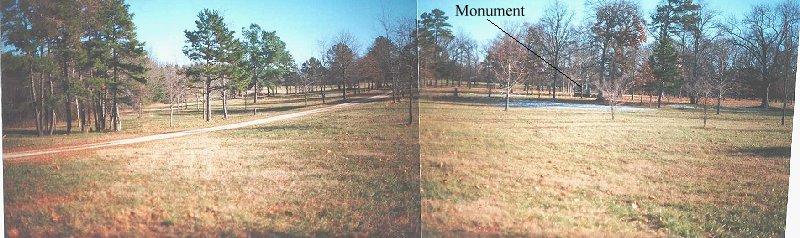
View From Washington's First Position
This is a view from behind the hill where the Continentals fought. Washington's cavalry had been stationed here before they routed Ogilvie's men. From here you can see a monument with surrounding trees on the right of the picture. Near this monument, the Continentals fought off the British attack. When the 71st Regiment moved to flank them, Howard ordered the flank refused. This created confusion, and the whole line began to retreat. Seeing this, Morgan selected a new line, and had his troops face about and fire. The fire devastated the disorganized troops, and Washington's cavalry moved to attack their rear. The militia from the first line had reformed and were now moving around the other British flank. Hundreds of British troops were encircled, and they threw down their weapons to surrender.
Tarleton rushed to his Legion cavalry and ordered them to attack and save the day. These men were better at massacring prisoners than actual fighting, and they fled the field. The American troops now attacked and captured the two 3 pounder guns. As the battle was winding down, William Washington chased down Tarleton for hand to hand combat. Washington was unsuccessful in his combat with Tarleton, and was lucky to escape with his life.
The battle is a tactical masterpiece admired to this day. The Americans suffered only 12 killed and 60 wounded. The British suffered 100 killed, 229 wounded, and 600 captured. Only the 200 Legion cavalrymen escaped. The two 3 pounders that were captured had originally been captured from the British at Saratoga, were recaptured at Camden, captured by the Americans at Cowpens, and the British eventually captured them back at Guilford Courthouse. Strategically, the British were significantly knocked down to size, and Cornwallis pursued Morgan and Greene as far as Virginia. Cornwallis was weakened, and Greene got stronger. After Guilford Courthouse, Cornwallis was so weak he couldn't hold North Carolina, but he advanced to Virginia and was forced to surrender at Yorktown.